Programming Drums for the BR-1600CD - A Primer
An Application Note by Gene Cookmeyer
![]()
http://www.topsoundproductions.com
If you’re like me, paging through a user manual for a piece of audio equipment is informative, but the immediate applications for using the equipment don’t jump out right away. What is more useful to me is a step-by-step approach with examples with explanations that show that actual use of the audio equipment in practice. This application note is (hopefully) the answer to for all those people who ask “Is there a tutorial on programming drums on the BR-1600CD?” as well as offer a step-by-step approach to those people new to programming drums on the BR-1600CD.
While specifically written for the BR-1600CD, this application note will hopefully apply to the BR-1200CD, and maybe even the BR-1180 DAWs as well. If you have either of these two alternative recording solutions, follow along with this example and if necessary, add any additional steps necessary for your platform.
What you CAN’T do with the built-in drum machineThe first thing I’ll discuss is what you can’t do with the BR-1600CD built-in drum machine. This is important because it does cause you may have to adjust the process with which you record a little to compensate.
Let’s say that you take out your guitar, start recording guitar and vocals on the BR-1600CD without regards to the tempo that your project is set to, and capture some really cool vocals with backing chords. Now you decide you’re ready to add drums and bass to the project. At this point you can forget the internal drum machine and bass machine as options. Why you ask?
Because rhythm arrangements (drums, bass and loop patterns) are tempo based – that is your project’s tempo dictates the timing of the drum and bass machines. If you’ve recorded your guitar and vocal tracks without regards to timing, you are out of luck – almost.
I say almost because if you’re one of those rare people with perfect timing, you might be able to set the tempo to match the backing tracks that you recorded, and then add the drum and bass tracks. However, if you’re like most people, your tempo probably drifted a little as the song went on leaving this option out.
If you did record guitar and vocals this way, I think the only practical way to record drums and bass would be to have a real drummer and a bassist play along with the tracks, which is certainly an option for some people, but it’s more likely that a majority of BR-1600CD owners out there don’t have this as an option. Instead the rest of us will have to follow a different procedure to laying down our drum tracks, the procedure set up for us by the good ole folks at Boss.
Now that you understand how project tempo affects the drum and bass machines in the BR-1600CD, what I consider the first step to be in recording drums is planning.
Planning your song’s musical arrangementMost songs follow one of any number of standard forms, like
VERSE/CHORUS (AABA),
INTRO
VERSE
CHORUS
BRIDGE
SOLO
If we can identify ahead of time, the length and musicality of each of these song elements, we’re ready to record drum tracks that can complement each of these elements. This obviously implies that you’ve written the song already or at least plotted out how you want it to flow, and know when and where the various song elements start and end throughout the song.
If you haven’t done this yet – take a step back and compose a song. Forget about drums for now (unless your song is a drum-centric rhythm and is critical to the genre of the song) – get your guitar out or keyboard or just do vocals and start singing along with some chord progressions while recording – start a new project and start recording ideas, chords and melody without regards to a tempo – capture your ideas on the fly and build on what you have or experiment and try something new – go back and listen to what you did and what you like and don’t like - in the end capture what inspires you first, organize it, prune it, and get it down on your BR-1600CD and on paper and voila you’ve got an original song to work with! [1].
For an example for this paper, let us take as an example a song I recently wrote with guitar in hand, a BR to record with, and a song-concept that I wanted to write about. The song is entitled “Pillar to Post”. Here is a few measures of this song that I recorded with a BR-864, external pre-amp and a condenser microphone. I recorded one mono track of acoustic guitar and my really raw vocals for this one. This is typical of a lot of my spur of the moment songwriting experiences... capture it with whatever I can at the time and add the polish with a full recording in my studio later.
The first thing you might observer about this song is that the strum pattern of the guitar is using 8th note triplets as part of the pattern. After writing this I quickly surveyed all of the BR-1600CD built-in drum patterns and couldn’t find one that fit this song very well [2].
Thus it’s left up to me to organize a drum pattern that will fit with my original song. The first thing I will do is break the song into different elements and determine the length of the elements.
| Element | Length (in 4 beat measures) |
| Intro | 2 |
| Verse | 8 |
| Chorus | 4 |
| Bridge | 8 |
| Solo | 2 |
| Ending | 8 |
Now that I’ve got a general arrangement to follow, I am ready to start creating drum parts that compliment my song.
If you haven’t done this already, create a new song. I assume that most of you readers out there know how to do this, but if you don’t just following the following steps to create a new song with no audio tracks:
Press the [UTILITY] button.
Drum Patterns are the building blocks for the drum machine in the BR-1600CD. I say that because they basically represent one or more measures of a part of your musical arrangement.
Drum patterns are accessed and created by using the PROGRAMMABLE RHYTHM buttons. Make sure the [PATTERN] button is selected by making sure the light is off on this button (when the light is on it you will be in arrangement mode which we’ll be talking about in the next section). Press the [EDIT] button. [3]
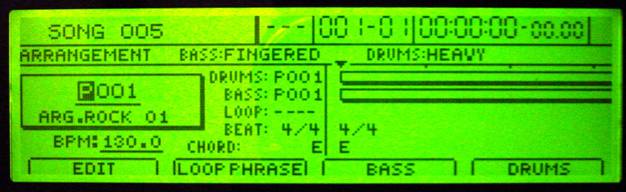
At this point the view on the BR-1600CD should look approximately like the following:
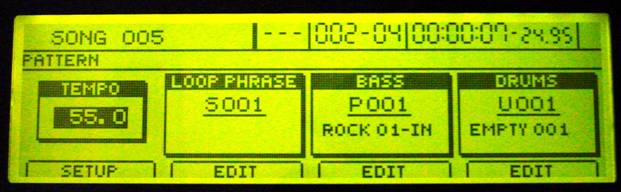
This displays the currently selected Tempo and allows access editing Loop Phrases, Bass and Drum loops. By default the tempo is set to 120.0, loop phrase is S001, and Bass and Drum patterns are P001 each (P means preset). As you can see I’ve changed a few things already in the picture above but don’t worry about that for now.
You can set the tempo for your song here on this view, or on the arrangement view by using the cursor keys to highlight the tempo and using the TIME/VALUE dial to adjust tempo. You can also adjust the tempo by simply pressing the TAP button (located below the MASTER fader) four times at your project tempo.
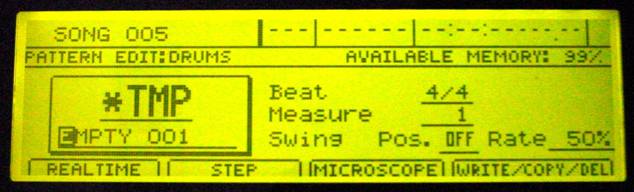
Press the [F4] button on this view to create and edit drum patterns. The following view should be displayed:
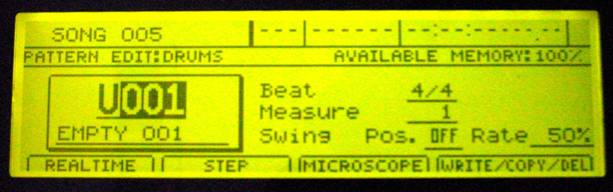
Do you see the U001 in this figure? That’s what pattern we’re going to start with for editing our new pattern. Your view probably says P001 which is one of the built-in presets. Move the cursor to the left (use the CURSOR keys) until it selects the P and then use the TIME/VALUE dial to change it to U (user) or S (song). Then move the cursor right to 001 and make sure it is one of the empty pattern locations. For my examples I’m using the U (user) locations but if you creating new patterns for each song that you write you probably want to select S (song) locations.
Doing all of this gives us a blank pattern location to record to that we can start with from scratch. Next we want to select the time signature for the pattern by moving the cursor to the BEAT field and turning the TIME/VALUE dial. Below are all the time signatures that the BR-1600CD supports.
1/1, 2/1, 3/1, 4/1, 5/1, 6/1, 7/1, 8/1
1/2, 2/2, 3/2, 4/2, 5/2, 6/2, 7/2, 8/2
1/4, 2/4, 3/4, 4/4, 5/4, 6/4, 7/4, 8/4
1/8, 2/8, 3/8, 4/8, 5/8, 6/8, 7/8, 8/8
The MEASURE field on this view identifies how long the pattern is given the time signature we’re using. Thus if we select 4/4 as our time signature that means each measure will have 4 beats. Changing MEASURE to 2 would give us 2 measures of 4 beats or an 8 beat long drum pattern.
For now we’ll ignore the SWING settings and leave them off. If you’re interested in what this does see the user’s manual for a complete explanation.
Now we’re ready to record our drum pattern. There are three ways to record a pattern represented by the 3 left choices on this view above: REALTIME, STEP or MICROSCOPE. The most common way I record patterns is by using REALTIME and that’s what this article will demonstrate. See the user’s manual for descriptions on the STEP and MICROSCOPE methods.
Press the [F1] (REALTIME) button to go in to realtime-recording mode. Here is what the display will look like now:
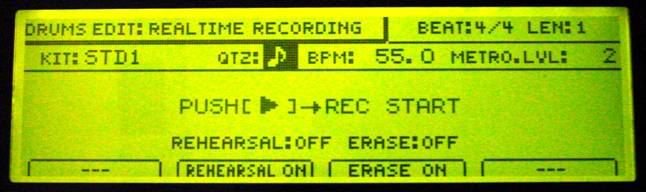
The cursor keys will move you between the following options on this view:
KIT: Which kit to use as the drum kit (STD1, STD2, ROOM, HEAVY, JAZZ, HIP-HOP, HOUSE, REGGAE, 808) for recording. This setting applies to recording only as we’ll select the real drum kit we use throughout the song when we do our arrangement.
QTZ: Quantize. What this does is set the drum hit that you play to the note nearest the quantization selection. This can be set to anything from a quarter-note to triplet-32nd notes or OFF.
BPM: Another opportunity for you to change this pattern’s tempo.
METRO. LVL: The metronome volume (0-3).
The two function keys that are active on this screen are [F2] (Rehearsal ON/OFF) and [F3] (Erase ON/OFF). We’ll talk about this in a second while we’re recording.
The last thing you need to know is that the drum input buttons [4] are the circular buttons below the faders on the front panel of the BR-1600CD. Button [1] will play a kick drum, Button [2] will play a snare and so on. Also if you hold the [V-TRACK] button down while pressing one of these buttons some of them play alternative sounds (i.e. [VTRACK]+[1] is a kick drum 2 sound).
When you’re ready to record, press the [PLAY] button. At this point a lead-in measure will be played with just the metronome and the BR-1600CD will start recording. Unless you touch any drum input buttons, all you should hear is the metronome.
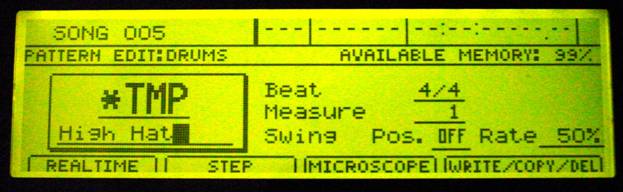
The first pattern I’m going to record will be the high hat pattern. I will select to quantize by 8th note triplets. I’ll use the [3] drum input button to add a closed high-hat. The display changes to this while recording:
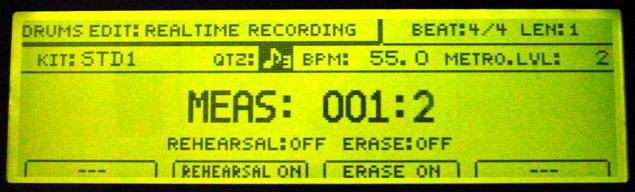
While recording if you press the [F2] button you can try out the various drum input buttons for the sound that you want to “layer” on top of what is already recorded. What buttons you hit will not be recorded while the display reads REHEARSAL: ON right below the word MEAS:. Pressing [F2] toggles between rehearsal mode on and off.
If you mess up while recording use the [F3] button to switch between recording and erasing mode. When erasing is on (ERASE:ON displayed right below the measure/beat marker) you will erase what drum input button you hold down, just hold it down for as long as you need to and erase part or all of the drum piece from the pattern. Likewise pressing [F3] toggles erase on and off.
When REHEARSAL:OFF and ERASE:OFF is displayed as above, whatever drum input button you press will be recorded into the pattern, and the pattern will repeat from the beginning continuously, allowing you to add more and more drum pieces to your pattern until you are satisfied with how it sounds.
Remember that the QTZ setting will change what you input accordingly. Set it to OFF if you don’t want any quantization.
Here is what the high-hat pattern sounds like after I recorded it.
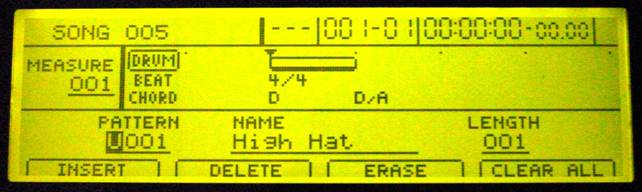
Press [STOP] when you’re completed recording. After recording the view changes to this:
Notice that the pattern selected has changed to *TMP now. This is because the pattern you just recorded is stored in temporary memory. We’re going to save this pattern in a second.
But first we’re going to give the pattern a name first. Move the cursor to where it says EMPTY 001 (or whatever might be listed there). Using the left and right cursor keys and the TIME/VALUE dial you can change the name of the pattern to whatever you like. I’ll name my first pattern “High Hat”. Now the display looks like this:
Now we’re going to save the pattern we created. Press [F4] (WRITE/COPY/DEL). The display will change to the following:
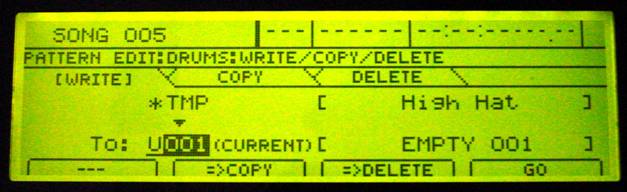
Here you have the opportunity to change which pattern you want to write the new pattern to. Move the cursor to the U or 001 fields and select which pattern location you want to save your newly created pattern. Press [F4] (Go) to write it to that location.
Note that the [F2] (Copy) and [F3] (Delete) buttons here will allow you to copy drum patterns from one location to another or delete pattern location contents.
Now I’m going to add Kick and Snare hits on top my pattern. After pressing [F4] (Go) the BR-1600CD will return to the previous screen. Now we’ll press [F1] REALTIME again. We’ll change the QTZ setting to quarter notes and the display will look like this again:

Where we’re done adding kick and snare we press [STOP] and get back to this screen:
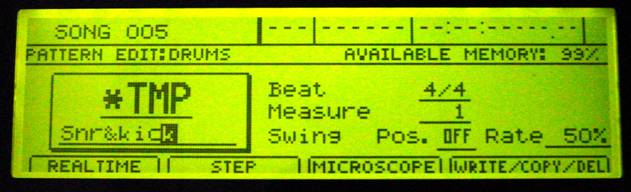
We name our pattern “Snr&kick” and save it just like before.
In all we’ll create 4 patterns that you can listen to here:
High hat, Snr&kick, Crash and Crash Fill1
Hopefully you’ve gotten the idea at this point, and you’re playing around with your own BR-1600CD creating your own drum patterns. The next thing to do is to arrange these patterns into our song.
Arranging Drum PatternsSwitch to arrangement mode by pressing the [ARRANGEMENT] button. The display will change to the following:
Move the cursor to the P and change it with the TIME/VALUE dial to either U (user) or S (song) and choose an empty arrangement to start with. Press [F4] to edit the drums portion of this arrangement. The display should change to the following:

The DRUM line on the display is what we’re most interested in here. Note that the [ZERO], [REW] and [FF] buttons in the transport section of the BR-1600CD will navigate you forward and backward through the song as you are arranging.
Let’s add four bars of high hats at the beginning of the song. Press [ZERO] to move the position to the start of song. Press the down cursor key to move down to the ---- right below PATTERN on the display.
Use the TIME/VALUE dial to select what drum pattern you want. For my song I’ll select U001. The display changes to the following:
Note the DRUM line has changed to show that our pattern is there and indicates how long the pattern is by the length of what is displayed. At this point we have the opportunity to change the length of the pattern we’re selecting. This really is a repeat count for the pattern that we’re using. So if we changed LENGTH to 002 the pattern would repeat twice and be two measures long in this case. But for my song I’m going to leave it at 001.
Now press the [FF] button. This will take us to the next measure.
Select the next pattern. For my song I’ll choose U003 on my BR-1600CD which is “Snr&kick”:
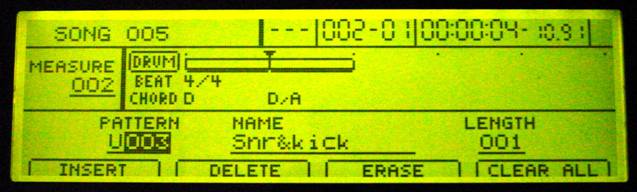
And I’m going to change the LENGTH of this one to 005.
Press [ZERO] and then [PLAY] to listen to the arrangement at any time. Press [STOP] to stop the playback.
Note the function keys [F1] (insert), [F2] delete, [F3] erase and [F4] clear can also be used to edit the arrangement as you’re composing it.
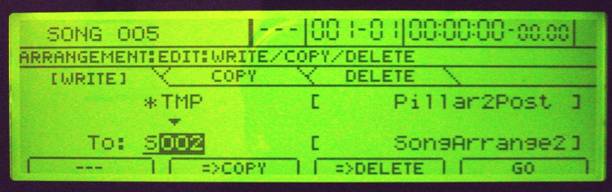
I’m hoping that you’re getting the idea by now. When you’re finished arranging, go ahead and write the arrangement to an empty arrangement location. Press [EXIT] to go back to the previous screen. Pressing [F1] (edit) on the main arrangement page will display the following:
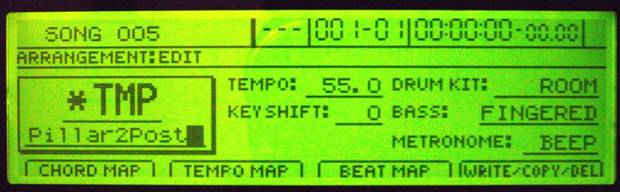
On this display we can change the main tempo of the arrangement, the drum kit that is used throughout the arrangement and other options related to bass arrangements and chord, tempo and beat maps which I won’t go into here.
For my arrangement, my tempo is 55.0 and I’ve changed the drum kit to ROOM since I liked the sound of that one best. I’ve also given my arrangement a name, “Pillar2Post”.
To save your arrangement press [F4] (WRITE/COPY/DEL). Saving the arrangement is similar to saving a pattern as discussed before. For my song I’ll save the arrangement as S002 so it’s saved with this song only.
After adding a few more drum pattern parts to my arrangement, my song now sounds like this. Now I'll go ahead and add a guitar part, in fact I recorded two guitar parts using my Godin LGXT using the Piezo pickup output and using the BR-1600CD COSM effects for a Mic'd Acoustic guitar sound. I panned the guitar parts left and right after recording and my song now sounds like this.
Now I’m ready to take the song to the next stage, possibly adding bass via the internal bass machine or using a bass guitar. But in essence at this point I've got a fairly decent song recording project in the works.
Remember that at this point you haven’t saved your work. To save your song, press [UTILITY] then select [SONG] and then [STORE] from the menus. I recommend saving your song often enough to avoid losing work if a power outage occurs.
That's all for this application note, I hope it comes in handy for you Boss Recorder users out there that are having difficulty in learning to program the drum machine.
Happy Recording!
BR-1600CD is a trademark of Boss Corporation
"Pillar to Post" melody and lyrics is (c) Copyright 2006 by Gene
Cookmeyer. All Rights Reserved.
[1]This is by no means a lesson on songwriting. I’m
just trying express to you that organizing the musical arrangement for your song happens
after you have a song to work with, and that you should follow whatever process you feel
comfortable with to compose your song. There
are no formulaic means for songwriting, so develop your own means and methodology of
composing with your own personal stamp on it.
[2]Preset P578 CNTRY 02-V1 was probably the closest but I
didn’t like the way the drum pattern fit with my strum pattern.
[3] Don’t worry if you hit [EDIT] before selecting the editing mode because the
PATTERN/ARRANGEMENT button toggles between the modes.
[4] The drum input buttons are not velocity-sensitive. What
this means is that every time you press a button it will have the same volume every time. If you have a MIDI keyboard (or other
 |
Convert BR-1600CD and BR-1200CD projects to WAV faster with
WAV-MAKER-1600! Visit this link to order now!. |
This article can be read in HTML format and the audio examples can be listened to on our website: http://www.topsoundproductions.com
(c) Copyright 2003-2014 by Top Sound Productions. All Rights Reserved.